Battery switch on travel trailer function is crucial for managing your RV’s power. Understanding how to use your battery switch – whether it’s a simple single switch or a more complex dual or automatic system – is key to avoiding dead batteries and ensuring your appliances work reliably. This guide breaks down everything you need to know, from basic operation to advanced troubleshooting.
We’ll cover different battery switch types, safe connection procedures, common problems and their solutions, essential maintenance tips, and even explore advanced battery management systems. Get ready to become a battery switch pro!
Understanding Battery Switch Functionality in Travel Trailers
Your travel trailer’s battery switch is a crucial component for managing your power system, allowing you to control the flow of electricity to and from your batteries. Understanding its function and operation is essential for maintaining your RV’s electrical system and preventing potential problems.
The primary purpose of a battery switch in a travel trailer is to disconnect your house batteries from the rest of the electrical system. This prevents battery drain when the trailer is not in use and protects your batteries from damage. It also allows you to selectively use different battery banks, if equipped.
Battery Switch Types
There are several types of battery switches commonly found in travel trailers, each with its own set of advantages and disadvantages. The choice depends on your power needs and budget.
The most basic is a simple single battery switch. This switch connects or disconnects a single battery bank to the trailer’s electrical system. It’s straightforward but limits your options if you have multiple batteries.
A dual battery switch allows you to manage two separate battery banks independently. This is common in trailers with a house battery and a starting battery for the tow vehicle. You can isolate one bank while using the other, maximizing battery life.
An automatic battery switch is more sophisticated. It automatically connects and disconnects batteries based on voltage levels or other pre-set parameters. This eliminates the need for manual switching and can improve battery management, preventing over-discharge. Some automatic switches can also prioritize charging one battery over another.
Operating a Typical Battery Switch
The operation of a battery switch varies slightly depending on the model, but the basic principles remain the same. It’s crucial to consult your owner’s manual for specific instructions for your particular switch.
Most battery switches have a series of positions, typically including “Off,” “Both,” “Battery 1,” and “Battery 2” (or similar labels). “Off” completely disconnects the batteries from the system. “Both” connects both banks together, “Battery 1” connects only the first battery bank, and “Battery 2” connects only the second. Moving the switch lever to the desired position establishes the connection.
- Identify the switch: Locate the battery switch, usually near your batteries or the main electrical panel.
- Determine the current position: Note the current position of the switch lever before making any changes.
- Select the desired position: Carefully move the switch lever to the desired position (“Off,” “Both,” “Battery 1,” or “Battery 2”).
- Verify the connection: After switching, check that the correct circuits are active or inactive as expected.
Advantages and Disadvantages of Battery Switch Types
The best type of battery switch for your travel trailer depends on your specific needs and budget. Let’s compare the common types:
| Battery Switch Type | Advantages | Disadvantages |
|---|---|---|
| Single Battery Switch | Simple, inexpensive | Limited functionality, only suitable for single battery systems |
| Dual Battery Switch | Independent control of two battery banks, improved battery management | Slightly more complex than a single switch, higher cost |
| Automatic Battery Switch | Automatic operation, prevents over-discharge, optimized charging | Most expensive option, potentially more complex to troubleshoot |
Connecting and Disconnecting Batteries
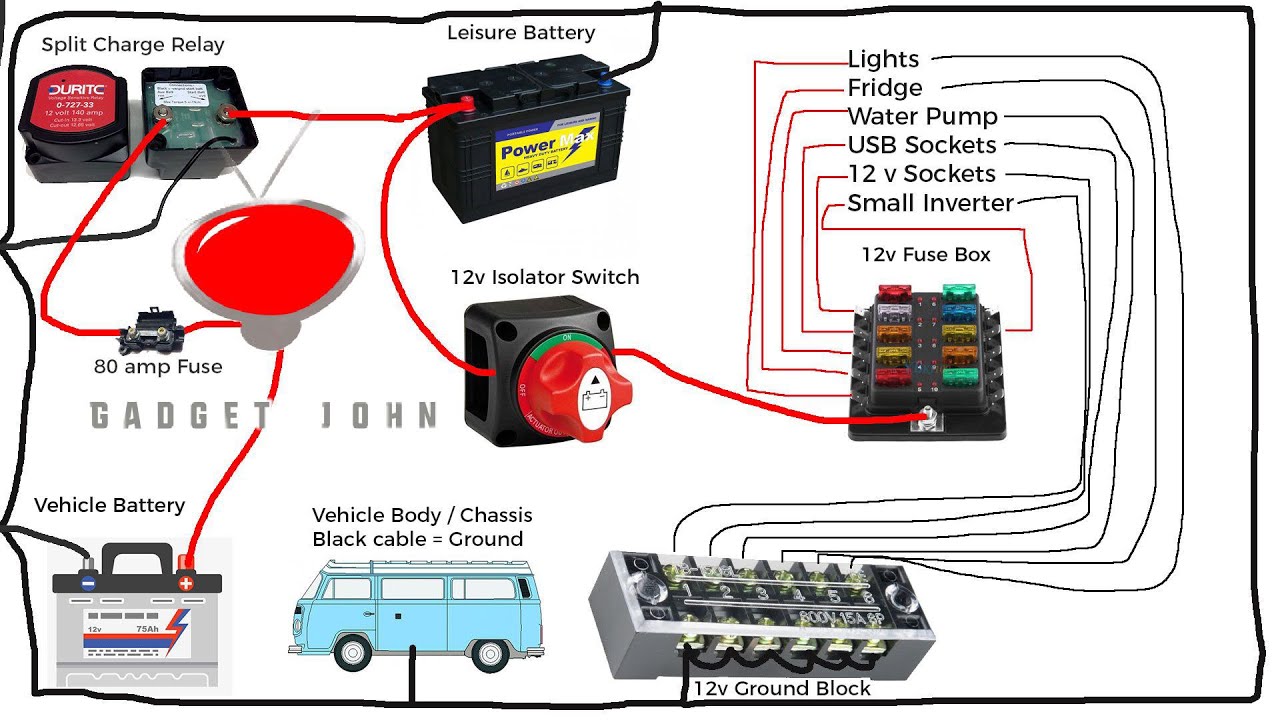
Connecting and disconnecting your travel trailer batteries to the battery switch is a straightforward process, but safety is paramount. Improper connections can lead to sparks, short circuits, and even battery explosions. Always prioritize safety when working with batteries and electrical systems.Properly connecting and disconnecting your batteries ensures reliable power for your trailer’s appliances and systems. This section details the safe and correct procedures for both dual and single battery setups, emphasizing the importance of correct wiring and component sizing.
Battery Connection and Disconnection Procedure
Before beginning any work, always disconnect the negative (-) terminal of your battery(ies) first. This minimizes the risk of accidental short circuits. When reconnecting, always connect the positive (+) terminal last. Wear safety glasses to protect your eyes from potential sparks or acid splashes. Have a wrench or socket of the correct size readily available for efficient and safe work.To disconnect a battery, carefully loosen and remove the cable clamp from the negative terminal first, then repeat the process for the positive terminal.
To connect, reverse the procedure, ensuring tight connections to prevent voltage drop and overheating.
Dual Battery System Wiring Configuration
A well-organized dual battery system enhances your travel trailer’s power capabilities and reliability. Below is a table illustrating the proper wiring configuration for a typical setup using a battery switch. Remember to use appropriately sized wiring and connectors for your specific system’s amperage requirements.
So, you’re planning a trip? Awesome! Don’t forget travel insurance – it’s a lifesaver. Check out Aon travel insurance for adventurous types, they often have great coverage for extreme activities. But for a more standard trip, you might want to look at Aon travel insurance options; they’re usually a bit more budget-friendly and still offer solid protection.
Comparing policies is key to finding the best fit for your needs and budget before you go.
| Wire Type | Connection Point | Function | Notes |
|---|---|---|---|
| Heavy-gauge positive (+) cable | Battery 1, Positive Terminal | Primary power source to battery switch | Typically 4 gauge or larger, depending on battery capacity and amperage draw |
| Heavy-gauge positive (+) cable | Battery 2, Positive Terminal | Secondary power source to battery switch | Same gauge as Battery 1 positive cable |
| Heavy-gauge positive (+) cable | Battery Switch, Input Terminals (from Batteries 1 & 2) | Carries power from batteries to switch | Ensure proper connections at the switch input terminals |
| Heavy-gauge positive (+) cable | Battery Switch, Output Terminal | Power output from the switch to the trailer’s electrical system | Connects to the positive bus bar or distribution panel |
| Heavy-gauge negative (-) cable | Battery 1, Negative Terminal | Ground connection for Battery 1 | Connects directly to the chassis ground or negative bus bar |
| Heavy-gauge negative (-) cable | Battery 2, Negative Terminal | Ground connection for Battery 2 | Connects directly to the chassis ground or negative bus bar |
| Heavy-gauge negative (-) cable | Chassis Ground | Main ground point for the entire system | A solid, clean ground connection is crucial for safe and efficient operation |
Problems from Incorrect Battery Connections
Incorrect battery connections can lead to a variety of problems. Reverse polarity (connecting the positive and negative cables incorrectly) can cause significant damage to your electrical system, potentially destroying sensitive electronics or even causing a fire. Loose connections create resistance, leading to overheating, voltage drops, and reduced battery life. Using undersized wiring can result in overheating and potential fire hazards.For example, a loose connection on a large-capacity battery powering a high-amperage appliance like an air conditioner could generate enough heat to melt the wire insulation and start a fire.
Similarly, incorrect polarity can instantly damage a sensitive voltage regulator.
Importance of Appropriately Sized Wiring and Connectors
Using appropriately sized wiring and connectors is crucial for safety and performance. Undersized wiring generates excessive heat, increasing the risk of fire. Oversized wiring is unnecessary and adds unnecessary cost and bulk. Consult wiring charts and your battery’s specifications to determine the correct gauge wire for your system’s amperage requirements. Connectors should be appropriately sized and rated for the current they will carry.
Corrosion on connectors can also lead to resistance and overheating, so regular cleaning and maintenance are important. Using appropriately sized components helps ensure the long life and safe operation of your entire electrical system.
Troubleshooting Common Battery Switch Issues: Battery Switch On Travel Trailer Function
Your travel trailer’s battery switch is a crucial component, and problems with it can leave you stranded. Understanding common issues and how to troubleshoot them can save you time, frustration, and potentially a costly repair bill. This section will guide you through diagnosing and resolving some typical battery switch problems.
Common Battery Switch Problems and Their Causes
Several issues can arise with your travel trailer’s battery switch. These range from simple problems like blown fuses to more complex electrical faults. Understanding the possible causes is the first step in effective troubleshooting. A common problem is a complete lack of power to the trailer’s 12V system, indicating a problem with the switch itself, its wiring, or a blown fuse.
Another frequent issue is inconsistent power – sometimes it works, sometimes it doesn’t – suggesting a loose connection or a failing switch. Finally, you might experience a blown fuse, which points to a short circuit somewhere in the 12V system connected to the switch.
Troubleshooting Flowchart
The following flowchart provides a step-by-step guide to troubleshooting your battery switch:
- Check the Fuses: Inspect both the main fuse(s) at the battery and any fuses within the trailer’s fuse panel related to the 12V system. Replace any blown fuses with fuses of the correct amperage rating. If a fuse blows immediately after replacement, there’s likely a short circuit in the wiring.
- Inspect the Switch: Carefully examine the battery switch itself for any signs of damage, corrosion, or loose connections. Tighten any loose connections. If the switch appears damaged, it will need replacement.
- Test the Battery: Use a multimeter to check the voltage of your trailer battery. A low voltage reading indicates a dead or weak battery. A fully charged 12V battery should read around 12.6 volts.
- Check the Wiring: Inspect all wiring connected to the battery switch for any signs of damage, fraying, or corrosion. Repair or replace any damaged wiring. Pay close attention to connections at both the battery and the switch itself.
- Test the Switch Function: With the multimeter, test the continuity of the switch in its various positions (e.g., battery to battery, battery to chassis, off). If the switch fails to show continuity, it needs replacement.
Solutions for Resolving Battery Switch Problems
Once you’ve identified the problem using the flowchart, addressing it is relatively straightforward. Replacing blown fuses is a simple task, involving removing the blown fuse and installing a new one of the same amperage. Repairing or replacing damaged wiring requires basic electrical skills and the use of appropriate tools and connectors. Replacing the battery switch is more involved and might require some electrical knowledge, or professional assistance if you are uncomfortable working with electrical systems.
If the problem persists after these steps, it’s best to consult a qualified RV technician.
Common Replacement Parts and Specifications
It’s wise to keep some common replacement parts on hand for quick repairs. This list provides examples, and you should always verify the specifications based on your specific trailer’s wiring and battery system.
Planning a trip? Don’t forget travel insurance! Seriously, it’s a lifesaver. Check out Aon travel insurance for comprehensive coverage, especially if you’re into adventurous activities. Then, once you’ve got that sorted, it’s time to plan the fun stuff! For a quick comparison, also look at Aon travel insurance options; they often have different packages to suit various needs and budgets.
Getting insured is one less thing to worry about while you’re exploring!
| Part | Specification | Notes |
|---|---|---|
| Fuses | Various amperages (e.g., 15A, 20A, 30A) – check your trailer’s manual | Always replace with fuses of the correct amperage rating. |
| Battery Switch | Check your existing switch for model number or manufacturer information. | Replacement switches should have a similar amperage rating and configuration. |
| Wire Connectors | Assorted sizes and types to match your trailer’s wiring | Crimp-on connectors are generally preferred for reliable connections. |
| Marine-grade Wire | Appropriate gauge for your system’s amperage requirements | Use wire rated for outdoor use. |
Battery Switch Maintenance and Safety
Keeping your travel trailer’s battery switch in top condition is crucial for reliable power and to prevent potentially dangerous situations. Regular maintenance ensures a long lifespan for your switch and prevents costly repairs down the line. Neglecting maintenance can lead to corrosion, poor connections, and even fire hazards.Regular inspection and cleaning are key components of a preventative maintenance plan.
A well-maintained battery switch will provide years of trouble-free service, ensuring you always have power when you need it.
Battery Switch Maintenance Schedule
A simple maintenance schedule will help keep your battery switch in optimal working order. It’s recommended to perform a visual inspection monthly and a more thorough cleaning and inspection at least twice a year, or more often if you use your trailer frequently in harsh environments. This schedule ensures early detection of any issues, preventing them from escalating into larger problems.
Inspecting Connections and Terminals
Regularly inspect all connections and terminals on your battery switch for signs of corrosion, damage, or looseness. Corrosion appears as a white, green, or blue powdery substance on the terminals and connections. Loose connections can lead to poor electrical contact, resulting in reduced power or even complete power failure. Damaged terminals might be cracked, broken, or significantly worn, reducing their conductivity and increasing the risk of overheating.
Look for any signs of melting or discoloration near the terminals, which could indicate excessive heat buildup.
Safety Precautions When Working with Batteries and Battery Switches
Working with batteries and electrical systems requires caution. Always disconnect the negative (-) battery terminal first before working on any part of the system, including the battery switch. This minimizes the risk of accidental short circuits. Wear appropriate safety glasses to protect your eyes from sparks or acid splashes. Never work on the battery system in a confined space with poor ventilation, as battery fumes can be hazardous.
Ensure the area is well-ventilated to prevent the buildup of potentially explosive hydrogen gas. Use insulated tools to avoid accidental shocks. If you are unsure about any aspect of the maintenance procedure, consult a qualified RV technician.
Cleaning and Maintaining Battery Terminals
Cleaning battery terminals is a crucial step in preventing corrosion and ensuring good electrical contact. Begin by disconnecting the negative (-) terminal first, followed by the positive (+) terminal. Use a wire brush or terminal cleaner to remove corrosion from both the terminals and the switch connections. Apply a battery terminal protector to prevent future corrosion. This protective coating helps repel moisture and prevents the buildup of corrosive materials.
Once clean, reconnect the positive (+) terminal first, followed by the negative (-) terminal. Tighten all connections securely. After cleaning, check for any signs of damage to the terminals and connections, replacing them if necessary. A small amount of dielectric grease can be applied to the terminals to further prevent corrosion and improve the electrical connection.
Impact of Battery Switch on Travel Trailer Systems
Your travel trailer’s battery switch is more than just an on/off switch; it’s the central control for your 12-volt DC power system. Understanding how it affects various systems is crucial for safe and efficient operation. A properly functioning switch ensures power flows correctly to your appliances and lights, while also providing a way to disconnect the house batteries to prevent drainage.The battery switch acts as a gatekeeper for the 12-volt power originating from your travel trailer’s batteries.
When the switch is in the “on” position, power flows to various systems like lights, water pumps, and other 12V appliances. Conversely, when switched “off,” it completely isolates the house batteries from these systems, preventing power drain when your trailer is not in use. This is particularly important for extended storage periods. Incorrect usage or a faulty switch can lead to unexpected issues and potential damage.
Effects on Travel Trailer Systems
A properly functioning battery switch ensures reliable power delivery to all 12-volt DC systems in your travel trailer. When the switch is turned on, power flows seamlessly to lights, enabling illumination inside and outside the trailer. The water pump receives power to provide water to your sinks and shower. Other 12V appliances, such as fans or interior lights, also operate normally.
A malfunctioning switch, however, can result in intermittent power, complete power failure to certain systems, or even accidental battery drainage. For instance, a switch stuck in the “on” position can lead to a completely drained battery even when the trailer isn’t being used.
Impact of a Faulty Battery Switch, Battery switch on travel trailer function
A faulty battery switch can manifest in several ways, leading to a range of problems. One common issue is an intermittent connection, resulting in flickering lights or an intermittently functioning water pump. In more serious cases, the switch might completely fail, leaving you without power to essential systems. A short circuit within the switch itself could potentially damage the batteries or other components in the electrical system.
A switch that doesn’t fully disconnect the house batteries can lead to complete battery drainage over time, even when the trailer is not in use, rendering your appliances inoperable. Consider the scenario of leaving your trailer for several weeks – a faulty switch could leave you with dead batteries and a frustrating experience upon your return.
Battery Power Conservation
The primary role of the battery switch in conserving battery power is its ability to completely isolate the house batteries from the trailer’s 12V systems. This is crucial when the trailer is stored for extended periods or when you’re not actively using the 12V appliances. By turning the switch off, you prevent any parasitic drain from devices that may draw a small amount of power even when turned off (like clocks or control boards).
This simple act significantly extends the lifespan of your batteries and prevents unexpected dead batteries. For example, a small, constant drain of just 0.1 amps over a month can deplete a typical RV battery, highlighting the importance of switching off when not in use.
Relationship with the Charging System
The battery switch doesn’t directly control the charging system, but it influences how effectively the charging system replenishes the batteries. When the switch is off, the charging system will still charge the batteries (assuming the charger is connected and turned on). However, if the switch is left on while the trailer isn’t being used, the batteries may not receive a full charge, or may even become discharged, as the charging system has to work harder to overcome the drain from various devices.
This is because the charging system must overcome any parasitic drain before it can begin charging the batteries efficiently. An effective strategy is to turn the switch off when not using the trailer to maximize charging efficiency.
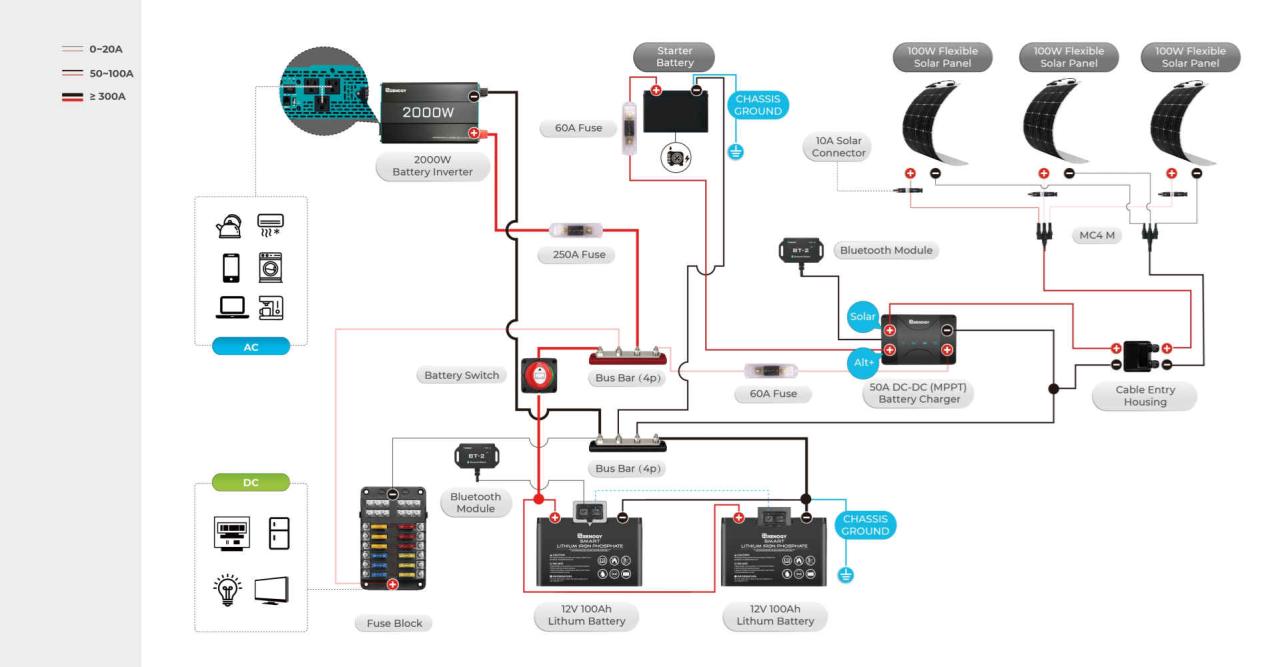
Advanced Battery Switch Configurations
Upgrading your travel trailer’s battery system beyond a basic switch opens up a world of convenience and control. Advanced battery switches offer features that simplify battery management and provide valuable insights into your power situation, leading to a more enjoyable and less stressful camping experience. Let’s explore the possibilities.
More sophisticated battery switches move beyond the simple on/off functionality of basic switches. They incorporate features like remote control, allowing you to manage your battery banks from inside your RV, regardless of weather conditions. Many also include monitoring capabilities, providing real-time data on battery voltage, amperage, and state of charge. This data is invaluable for preventing unexpected power outages and ensuring you always have enough power for your needs.
Remote Control Battery Switches
Remote control battery switches offer the ultimate in convenience. Imagine being able to switch between your house batteries and your starting battery from the comfort of your RV’s interior, especially during inclement weather. These switches typically use a wired or wireless connection to a control panel inside the RV. This eliminates the need to crawl under your trailer to manually operate the switch, saving you time and effort.
Some systems even integrate with smart home technology, allowing control through a smartphone app.
Battery Monitoring Systems
These systems provide real-time data on the state of your battery banks. This is crucial for preventative maintenance and avoiding unexpected power failures. Information such as voltage, amperage, and state of charge is typically displayed on a digital panel or through a smartphone app. Some advanced systems can even predict remaining runtime based on current power consumption.
This predictive capability allows you to adjust your power usage accordingly, preventing a sudden power drain.
Advanced Battery Management Systems (BMS)
Advanced battery management systems go beyond simple monitoring. They actively manage the charging and discharging of your batteries to optimize their lifespan and performance. This might involve features like balancing cell voltages in lithium batteries, preventing overcharging or deep discharging, and automatically prioritizing power to essential systems during low-power situations. Different BMS systems will have varying levels of sophistication and capabilities, depending on their design and the battery chemistry they are designed to work with.
Comparison of Advanced Battery Switch Systems
Choosing the right system depends on your needs and budget. Here’s a comparison of some key features and considerations:
- Wired Remote Switches: Reliable, less susceptible to interference, but requires wiring installation.
- Wireless Remote Switches: Convenient, easy installation, but potentially susceptible to interference or signal loss.
- BMS with Integrated Monitoring: Comprehensive control and monitoring, but typically more expensive.
- Standalone Monitoring Systems: More affordable than integrated BMS, but requires separate installation and may not offer the same level of control.
Scenarios Benefiting from Advanced Configurations
Advanced battery switch configurations are particularly beneficial in several scenarios. For example, during extended off-grid camping, a remote controlled switch combined with a battery monitoring system allows you to closely monitor your power reserves and manage power usage effectively. In situations with multiple battery banks (e.g., lithium and lead-acid), a sophisticated BMS ensures that each battery type is charged and discharged optimally, maximizing lifespan and performance.
Finally, for RVers with complex electrical systems, an advanced system provides valuable data and control to prevent power-related problems.
Pros and Cons of Advanced Battery Switch Systems
Weighing the pros and cons is crucial before investing in an advanced system.
- Pros: Increased convenience, improved battery management, enhanced safety, real-time monitoring, extended battery lifespan, prevention of unexpected power outages.
- Cons: Higher initial cost, increased complexity of installation, potential for system failures, reliance on technology (in the case of wireless systems).
Mastering your travel trailer’s battery switch isn’t just about avoiding frustrating breakdowns; it’s about maximizing your RV’s functionality and extending the life of your batteries. By understanding the different types of switches, performing regular maintenance, and knowing how to troubleshoot common issues, you’ll ensure smooth and reliable power throughout your adventures. So, get out there and enjoy the open road, knowing you’ve got your power under control!
Essential Questionnaire
What size fuses should I use with my battery switch?
The appropriate fuse size depends on the amperage rating of your battery switch and wiring. Consult your switch’s manual or a qualified electrician for the correct size.
How often should I clean my battery terminals?
Ideally, inspect and clean your battery terminals every three months or before each trip to prevent corrosion and ensure good electrical connections.
My battery switch is making a clicking noise. What’s wrong?
A clicking noise often indicates a faulty switch, low battery voltage, or a problem with the wiring. Check your battery voltage and connections first. If the problem persists, replace the switch.
Can I use a battery switch with lithium batteries?
Some battery switches are compatible with lithium batteries, but others are not. Always check the manufacturer’s specifications for both the battery and the switch to ensure compatibility. Improper use can damage the batteries or the switch.
